As described in the section Quick Start with Plesk, the first step in establishing your company's web presence is signing up to the services provided by a hosting company (hosting provider). After you subscribe to a hosting plan, a customer account in Plesk is created to enable you to log in to Plesk and use the hosting services and resources like mailboxes, disk space, and bandwidth.
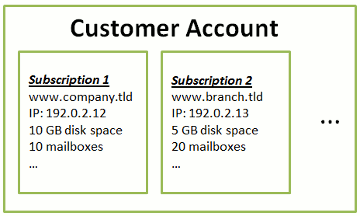
Plesk allows you to subscribe to as many hosting plans as you need. For example, if you do not want your main site to share hosting resources with a company's branch site you can subscribe to another hosting plan under the same customer account. In other words, a customer account is a personalized access to all your subscriptions (see the picture below).

Another reason for using multiple subscriptions is that subscription is limited to only one IPv4 and one IPv6 address. Thus, all domains within a subscription share the same IP address (v4 or v6). If you need to host sites on different IP addresses, you should additionally order the same plan for as many IP addresses as you need. This can be useful, for example, if you want to secure connections to each of your sites with a separate SSL/TLS certificate.
For each hosting subscription, Plesk creates a system user - a user account in the Plesk server operating system. Customers obtain their system users' access credentials from their service providers and use these credentials for connecting to the server through FTP, SSH, and so on. In addition, all operations with files and directories in Plesk are performed on behalf of system users. For example, when a customer adds a new file in File Manager, the subscription's system user becomes the owner of the file.
In Plesk versions prior to 12.0, users who had several hosting accounts found it inconvenient to access the settings of a particular domain or mailbox. To operate a domain or a mailbox, customers first had to go to the subscription to which the domain or mailbox belonged.
In Plesk 12.0, navigation among websites has become easier for customers who have several hosting accounts and access to several subscriptions. Now you can display the sites or email addresses associated with all your subscriptions on one page.
You can distinguish sites that belong to different subscriptions by their associated system users: Sites in the same subscription have the same system user.
To view and manage sites of a particular subscription:
Select the subscription name in the Subscription menu at the top of the page.
To view and manage all your sites:
Select All subscriptions in the Subscription menu at the top of the page. The All subscriptions option enables you to view and manage all your sites or mailboxes from a single page.
On other pages of the Customer Panel (Applications, Files, Statistics, and so on), if All subscriptions is selected, you are prompted to select the site for which you want to perform an action: Install an application, create a mail account, upload a file, view statistics, and so on.
Purchasing a new subscription for extending hosting resources is not always necessary. You can always improve just one of your subscriptions. For example, add extra disk space or SSL/TLS support. This can be done by switching to another hosting plan or by purchasing hosting plan add-ons.
If you see the "Warning: Subscription was suspended. All your sites are not available." message after logging into your account and choosing a subscription, it means that the subscription in question has been suspended. There are a number of reasons a subscription can become suspended:
While a subscription is suspended, you are unable to manage any of its aspects (such as web hosting settings, mail accounts, databases and so on). Your websites may also be unavailable depending on the settings configured by the provider.
Only the provider can resume your subscription. We recommend contacting your provider as soon as possible to resolve the issue.
In Plesk, you can perform a number of administrative operations on your customer account:
If the number of hosting maintenance operations is too large to be handled by one person, you can delegate some of them to other people. For this purpose, you can create additional user accounts grouped by means of user roles. For example, you can create a group that is allowed to only upload content to websites. Users in this group will not be able to perform any operations except for managing website content. For more information about additional users, refer to the section (Advanced) Managing Additional User Accounts.